> ## Documentation Index
> Fetch the complete documentation index at: https://docs.checkoutrules.com/llms.txt
> Use this file to discover all available pages before exploring further.
# Validate/block checkout
> Show errors or block invalid (or not allowed) checkout under given conditions.
## Rule overview
This rule allows you to validate or block the checkout process based on defined conditions. You can show custom error messages or completely prevent checkout when certain criteria is met, such as invalid cart contents, restricted shipping regions, customer tags, or missing product attributes, etc.
This helps enforce business rules, prevent unsupported orders, and guide customers to resolve issues before completing the checkout.
## Sample configuration
The following steps show how to create and configure a **Validate/Block Checkout** rule using the app.
### Create a new rule
From your [Shopify admin](/guides/en/get-started/installation#go-to-the-app), open the app. In the sidebar, go to the [Rules](/guides/en/get-started/quickstart#create-a-sample-rule) section and click *"Create Rule"*.
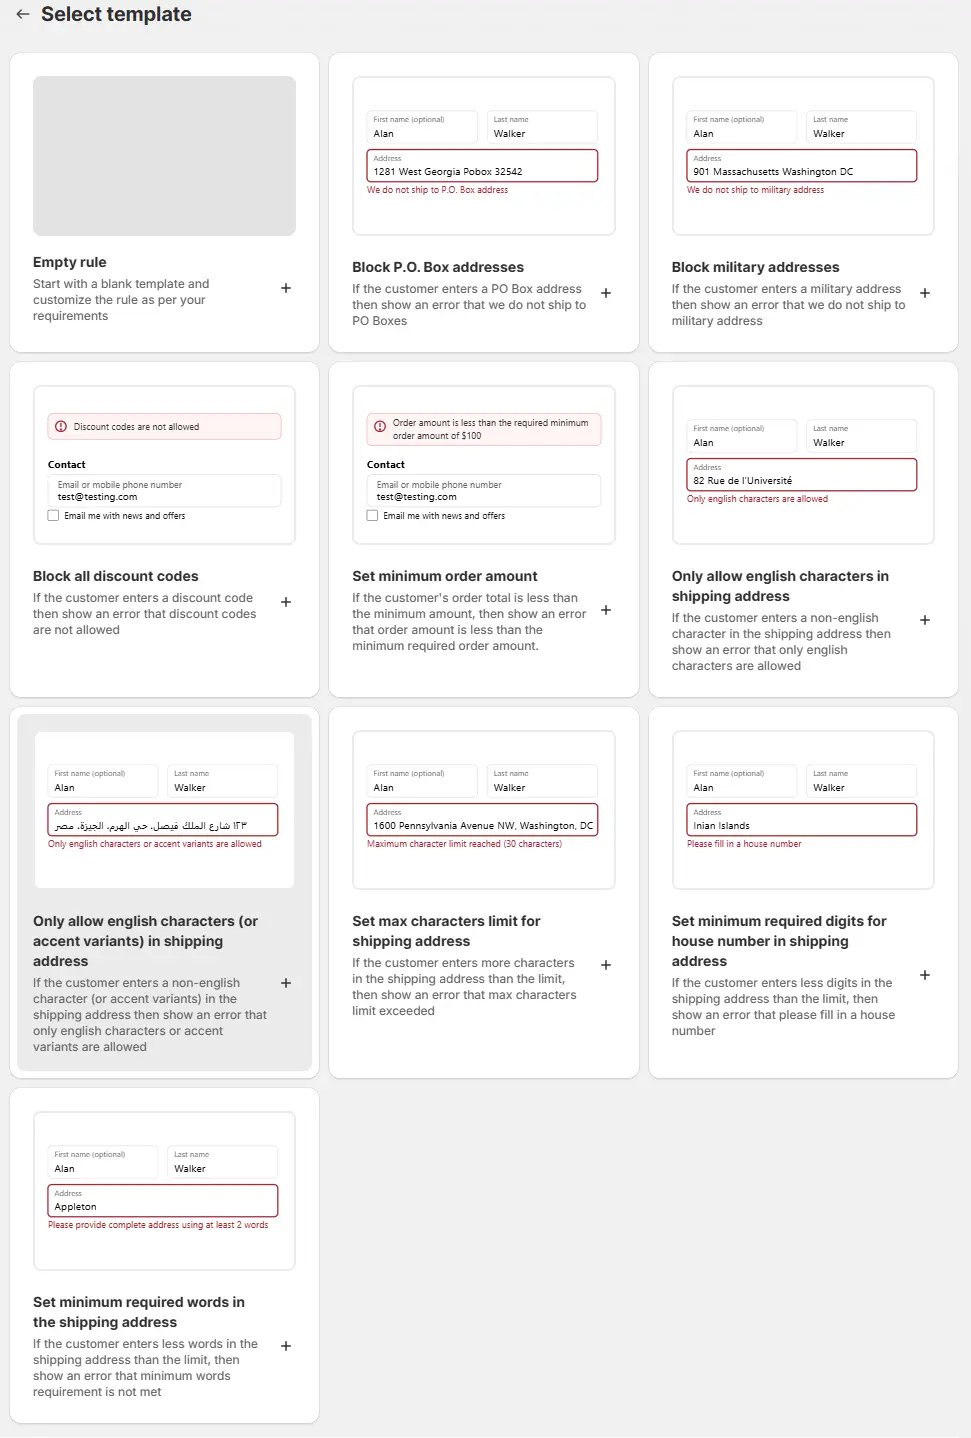
Then, You’ll be redirected to the **Select checkout rule type screen**. Choose *category "Validation " → select checkout rule type "Validate/Block Checkout" → click “Select Rule”*.
Then, in the **template selection**, choose an option based on your requirements. In most cases, you can choose the empty rule as a starting point and modify it to your needs. Even if you choose a prefilled template, you will be able to modify it later.
Next, you’ll land on the **Create new validate/block checkout rule** screen, where you can configure your rule.
### Rule configuration
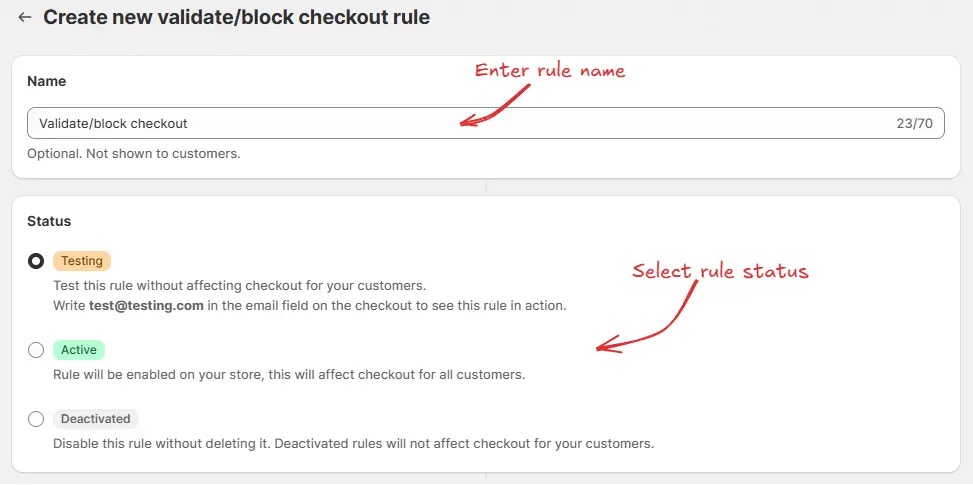
To configure the rule, first optionally we can add a name such as "Validate/block checkout" to describe what it does. Then, select the rule [status](/guides/en/get-started/concepts#status): Testing, Active, or Deactivated.
Here we are going to choose **Testing** status, so we can quickly test the rule without affecting the checkout for actual customers.
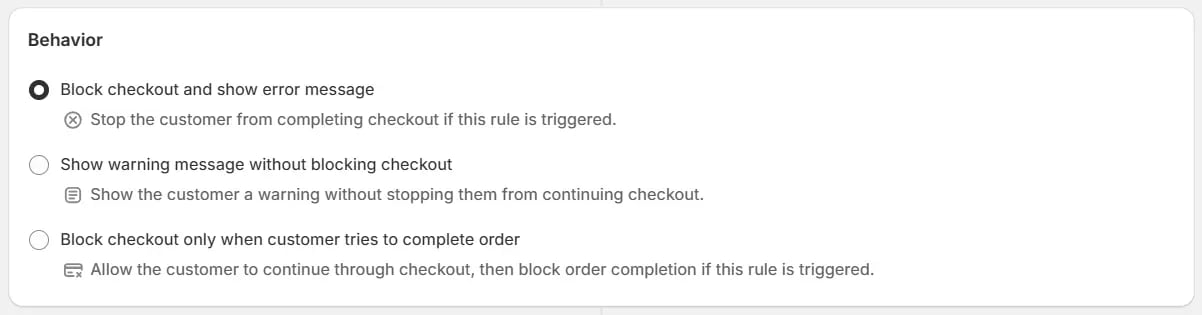
Next, on the same screen, select the appropriate [Behavior](/guides/en/get-started/concepts#behavior) for the rule. You can choose to **Block checkout and show error message**, **Show warning message without blocking checkout**, or **Block checkout only when customer tries to complete order**, depending on how you want the rule to affect the checkout process.
If you are unsure about what to choose for any rule settings, many times the
default preselected option is the best choice. You can always start with the
default option and modify it later.
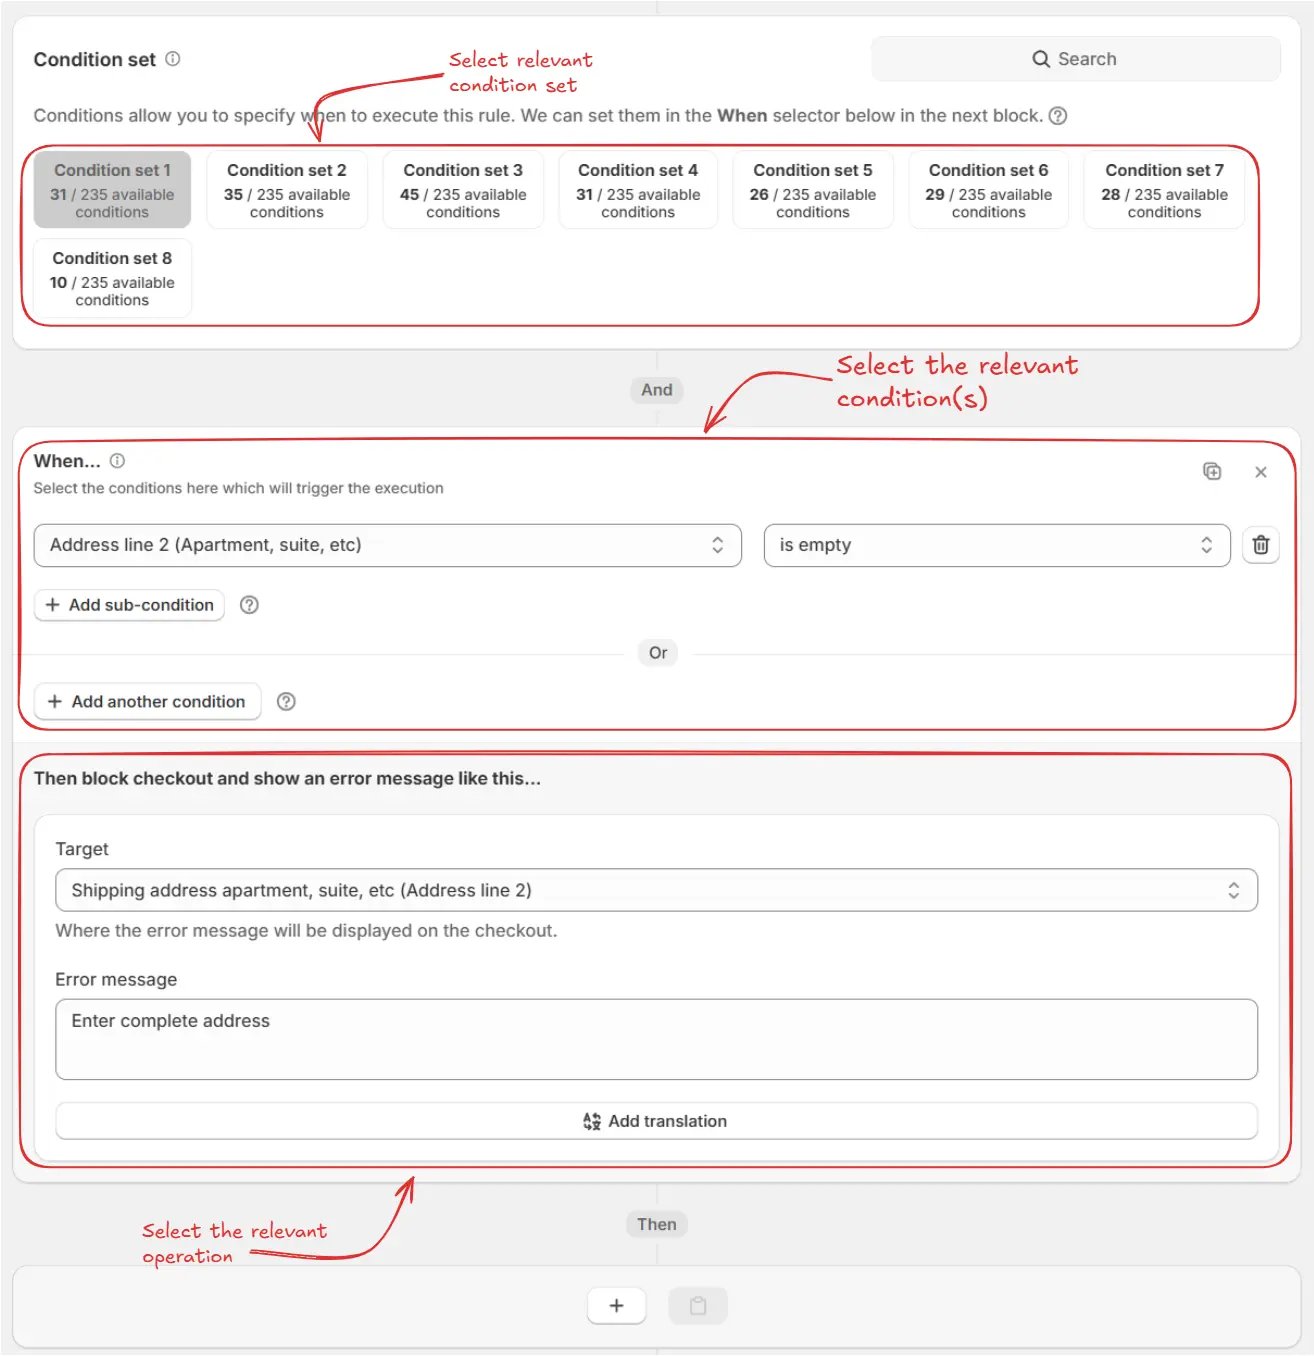
Next, on the same screen, select the relevant [condition set](/guides/en/get-started/concepts#condition-set), [condition](/guides/en/get-started/concepts#conditions-when), and [action](/guides/en/get-started/concepts#action-what).
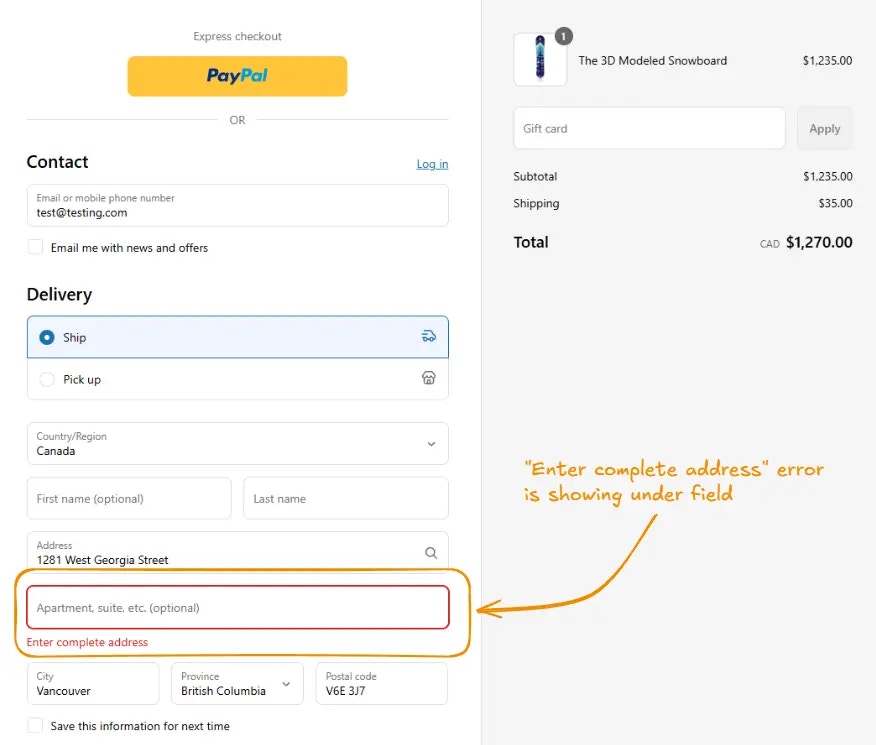
> As an example, here we are using the default **Condition set 1**, setting the rule to trigger when the **"Address line 2 (Apartment, suite, etc.)"** field is **empty**, and configuring it to block checkout. The error message **"Enter complete address"** will be displayed under the **Shipping address line 2** field at the checkout, requiring customers to provide their complete address before proceeding.
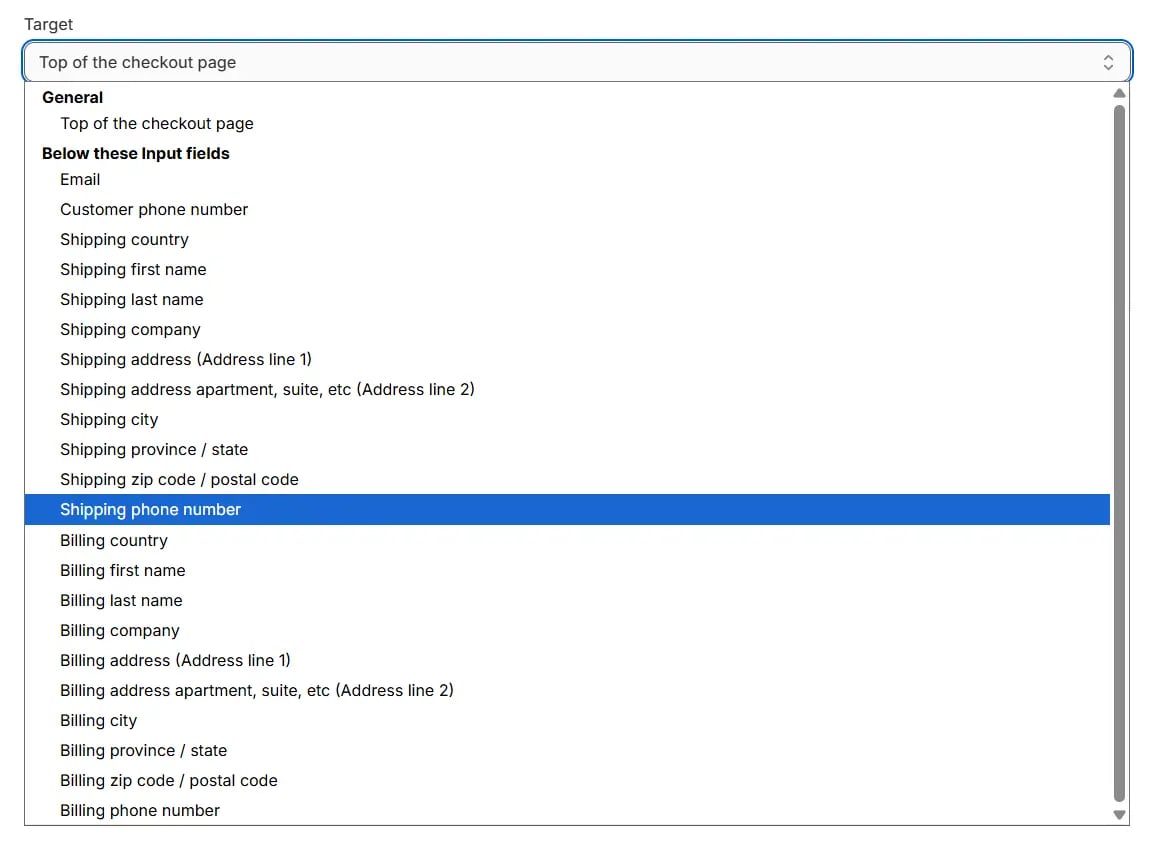
In the **Action** section, you can choose the **target location** where your custom error message will appear on the checkout page. The dropdown menu provides a list of placement options:
* Under the **General** category, you can select **"Top of the checkout page"** to display the action at the very top.
* Under **Below these Input fields**, you can select to show the action below specific input fields, such as: Email, Customer phone number, Shipping country, Shipping first name, Shipping last name, Shipping company, Shipping address (Address line 1), Shipping address apartment, suite, etc. (Address line 2), Shipping city, Shipping province / state, Shipping zip code / Postal code, Shipping phone number, Billing country, Billing first name, Billing last name, Billing company, Billing address (Address line 1), Billing address apartment, suite, etc. (Address line 2), Billing city, Billing province / state, Billing zip code / postal code, and Billing phone number.
This gives you control over where the error message appears, helping you place it in the most relevant section of the checkout form.
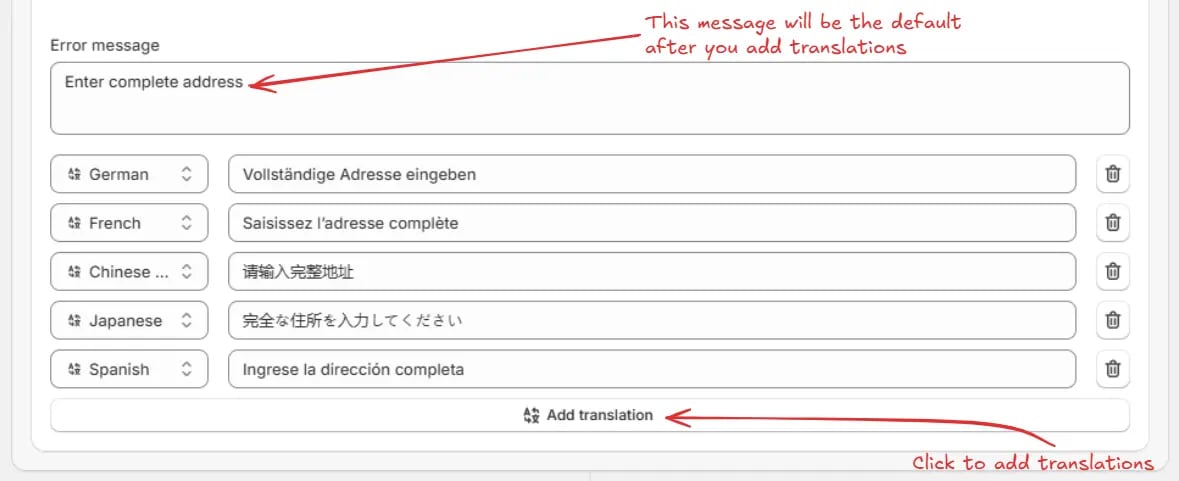
After that, you can enter your message in the **"Error message"** field. The message you enter will be displayed on the checkout page.
Optionally, you can add translations by clicking the **"Add translation"** button and entering the translated message for the desired languages. The message entered before adding translations will be used as the default message and will be shown whenever a translation is not available.
Next, on the same screen, select how the system should behave in the rare case, if the app fails or experiences a problem during checkout. This is a fallback option, and in most cases you would want to allow the customer to complete the checkout, which is the default option. You’ll find two options:
* **Allow customer to complete checkout** : This ensures that even if the app encounters an issue, the customer can still proceed with their purchase without interruption.
* **Block customer from completing checkout**: This will stop the customer from checking out if the app fails, potentially preventing transactions.
Choose the option that aligns best with your desired customer experience and risk tolerance.
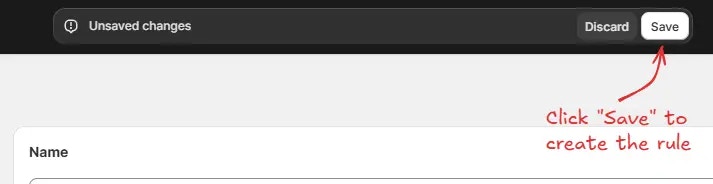
Finally, click the Save button at the top to create and save your rule.
## Test the rule
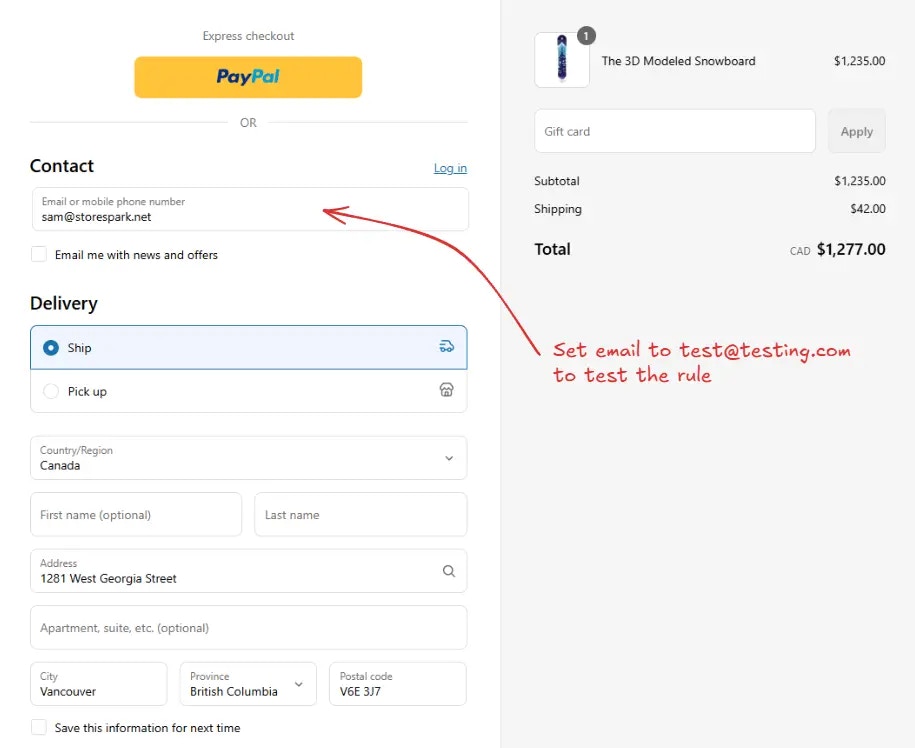
Since, the rule is set to testing status, we have to use `test@testing.com` as the email, instead of the actual email, to run the rule at checkout.
The image below shows the checkout page before the testing email
address was used. Please note the error message is not yet displayed.
Please ensure to fill out all the required fields in the shipping address.
Shopify will only run the rule if all the required fields are filled out and
the customer is actually ready to checkout, to prevent running the rule on
every keystroke.
After leaving the Address line 2 (Apartment, suite, etc.) field **empty**, the checkout rule runs and blocks the checkout process. We can verify that the error message **"Enter complete address"** is displayed under the **Shipping address line 2** field at the checkout, as shown below.
## Activate the rule
Once testing is done, we can activate the rule, so it can start making changes to the checkout for actual customers. Only activated rules can make changes to the checkout for all customers.
Click on **Rules** in the sidebar to view all rules. Select the rule you want to activate, then click the **Activate** button to activate it.
Rule activation is only available on paid plans. If you haven't upgraded your
plan yet, follow the instructions
[here](/guides/en/get-started/installation#upgrade-your-plan) to upgrade.
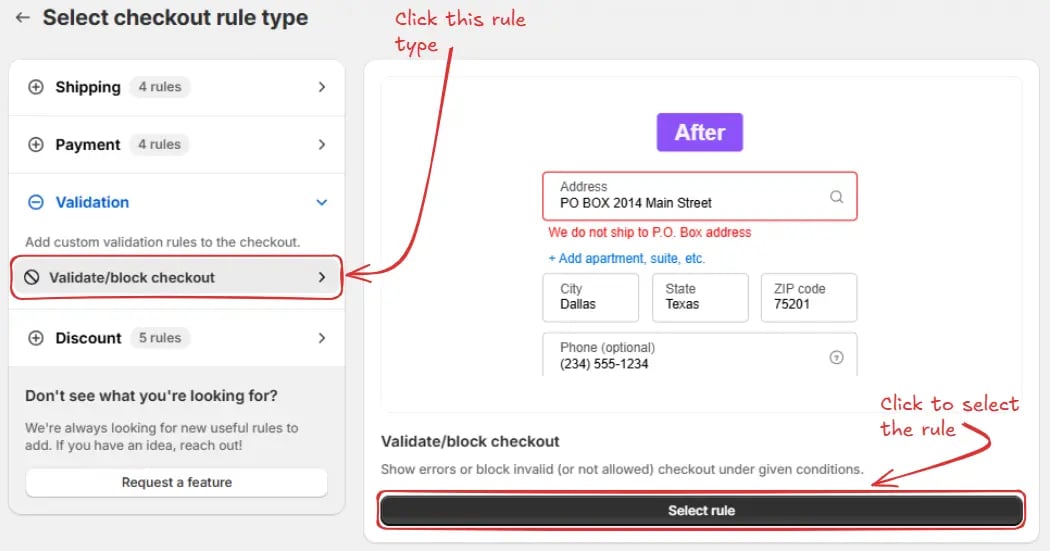 Then, in the **template selection**, choose an option based on your requirements. In most cases, you can choose the empty rule as a starting point and modify it to your needs. Even if you choose a prefilled template, you will be able to modify it later.
 Next, you’ll land on the **Create new validate/block checkout rule** screen, where you can configure your rule.
### Rule configuration
To configure the rule, first optionally we can add a name such as "Validate/block checkout" to describe what it does. Then, select the rule [status](/guides/en/get-started/concepts#status): Testing, Active, or Deactivated.
Here we are going to choose **Testing** status, so we can quickly test the rule without affecting the checkout for actual customers.
Next, you’ll land on the **Create new validate/block checkout rule** screen, where you can configure your rule.
### Rule configuration
To configure the rule, first optionally we can add a name such as "Validate/block checkout" to describe what it does. Then, select the rule [status](/guides/en/get-started/concepts#status): Testing, Active, or Deactivated.
Here we are going to choose **Testing** status, so we can quickly test the rule without affecting the checkout for actual customers.
 Next, on the same screen, select the appropriate [Behavior](/guides/en/get-started/concepts#behavior) for the rule. You can choose to **Block checkout and show error message**, **Show warning message without blocking checkout**, or **Block checkout only when customer tries to complete order**, depending on how you want the rule to affect the checkout process.
 Next, on the same screen, select the relevant [condition set](/guides/en/get-started/concepts#condition-set), [condition](/guides/en/get-started/concepts#conditions-when), and [action](/guides/en/get-started/concepts#action-what).
> As an example, here we are using the default **Condition set 1**, setting the rule to trigger when the **"Address line 2 (Apartment, suite, etc.)"** field is **empty**, and configuring it to block checkout. The error message **"Enter complete address"** will be displayed under the **Shipping address line 2** field at the checkout, requiring customers to provide their complete address before proceeding.
Next, on the same screen, select the relevant [condition set](/guides/en/get-started/concepts#condition-set), [condition](/guides/en/get-started/concepts#conditions-when), and [action](/guides/en/get-started/concepts#action-what).
> As an example, here we are using the default **Condition set 1**, setting the rule to trigger when the **"Address line 2 (Apartment, suite, etc.)"** field is **empty**, and configuring it to block checkout. The error message **"Enter complete address"** will be displayed under the **Shipping address line 2** field at the checkout, requiring customers to provide their complete address before proceeding.
 In the **Action** section, you can choose the **target location** where your custom error message will appear on the checkout page. The dropdown menu provides a list of placement options:
* Under the **General** category, you can select **"Top of the checkout page"** to display the action at the very top.
* Under **Below these Input fields**, you can select to show the action below specific input fields, such as: Email, Customer phone number, Shipping country, Shipping first name, Shipping last name, Shipping company, Shipping address (Address line 1), Shipping address apartment, suite, etc. (Address line 2), Shipping city, Shipping province / state, Shipping zip code / Postal code, Shipping phone number, Billing country, Billing first name, Billing last name, Billing company, Billing address (Address line 1), Billing address apartment, suite, etc. (Address line 2), Billing city, Billing province / state, Billing zip code / postal code, and Billing phone number.
This gives you control over where the error message appears, helping you place it in the most relevant section of the checkout form.
In the **Action** section, you can choose the **target location** where your custom error message will appear on the checkout page. The dropdown menu provides a list of placement options:
* Under the **General** category, you can select **"Top of the checkout page"** to display the action at the very top.
* Under **Below these Input fields**, you can select to show the action below specific input fields, such as: Email, Customer phone number, Shipping country, Shipping first name, Shipping last name, Shipping company, Shipping address (Address line 1), Shipping address apartment, suite, etc. (Address line 2), Shipping city, Shipping province / state, Shipping zip code / Postal code, Shipping phone number, Billing country, Billing first name, Billing last name, Billing company, Billing address (Address line 1), Billing address apartment, suite, etc. (Address line 2), Billing city, Billing province / state, Billing zip code / postal code, and Billing phone number.
This gives you control over where the error message appears, helping you place it in the most relevant section of the checkout form.
 After that, you can enter your message in the **"Error message"** field. The message you enter will be displayed on the checkout page.
 Optionally, you can add translations by clicking the **"Add translation"** button and entering the translated message for the desired languages. The message entered before adding translations will be used as the default message and will be shown whenever a translation is not available.
 Next, on the same screen, select how the system should behave in the rare case, if the app fails or experiences a problem during checkout. This is a fallback option, and in most cases you would want to allow the customer to complete the checkout, which is the default option. You’ll find two options:
* **Allow customer to complete checkout** : This ensures that even if the app encounters an issue, the customer can still proceed with their purchase without interruption.
* **Block customer from completing checkout**: This will stop the customer from checking out if the app fails, potentially preventing transactions.
Choose the option that aligns best with your desired customer experience and risk tolerance.
Next, on the same screen, select how the system should behave in the rare case, if the app fails or experiences a problem during checkout. This is a fallback option, and in most cases you would want to allow the customer to complete the checkout, which is the default option. You’ll find two options:
* **Allow customer to complete checkout** : This ensures that even if the app encounters an issue, the customer can still proceed with their purchase without interruption.
* **Block customer from completing checkout**: This will stop the customer from checking out if the app fails, potentially preventing transactions.
Choose the option that aligns best with your desired customer experience and risk tolerance.
 Finally, click the Save button at the top to create and save your rule.
 ## Test the rule
Since, the rule is set to testing status, we have to use `test@testing.com` as the email, instead of the actual email, to run the rule at checkout.
## Test the rule
Since, the rule is set to testing status, we have to use `test@testing.com` as the email, instead of the actual email, to run the rule at checkout.
 ## Activate the rule
Once testing is done, we can activate the rule, so it can start making changes to the checkout for actual customers. Only activated rules can make changes to the checkout for all customers.
Click on **Rules** in the sidebar to view all rules. Select the rule you want to activate, then click the **Activate** button to activate it.
## Activate the rule
Once testing is done, we can activate the rule, so it can start making changes to the checkout for actual customers. Only activated rules can make changes to the checkout for all customers.
Click on **Rules** in the sidebar to view all rules. Select the rule you want to activate, then click the **Activate** button to activate it.
